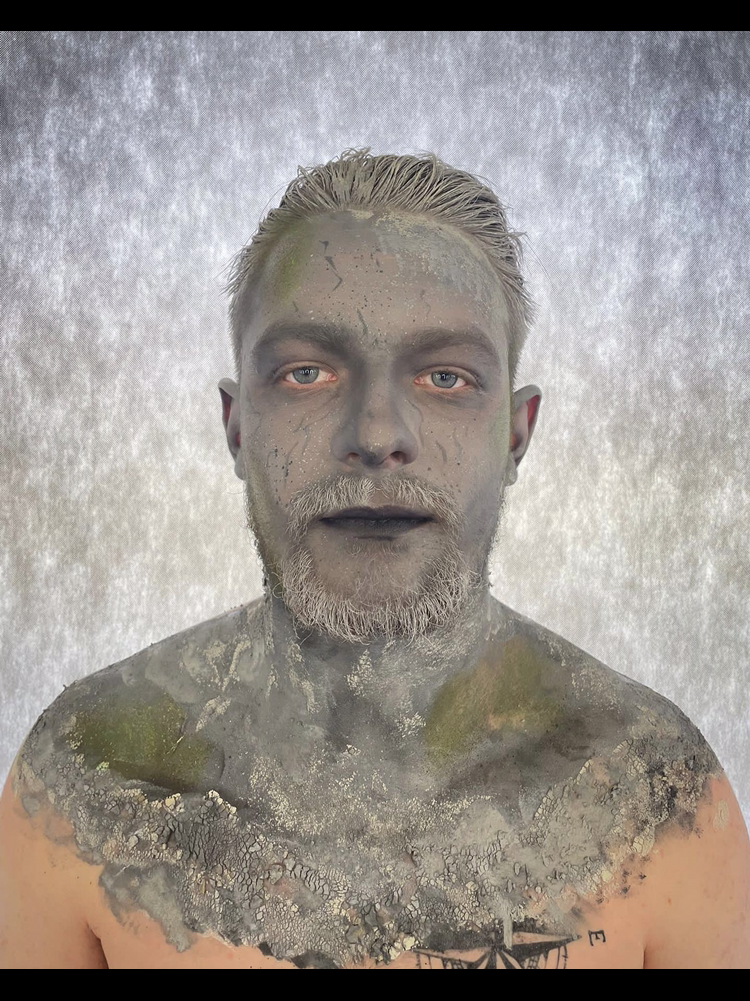
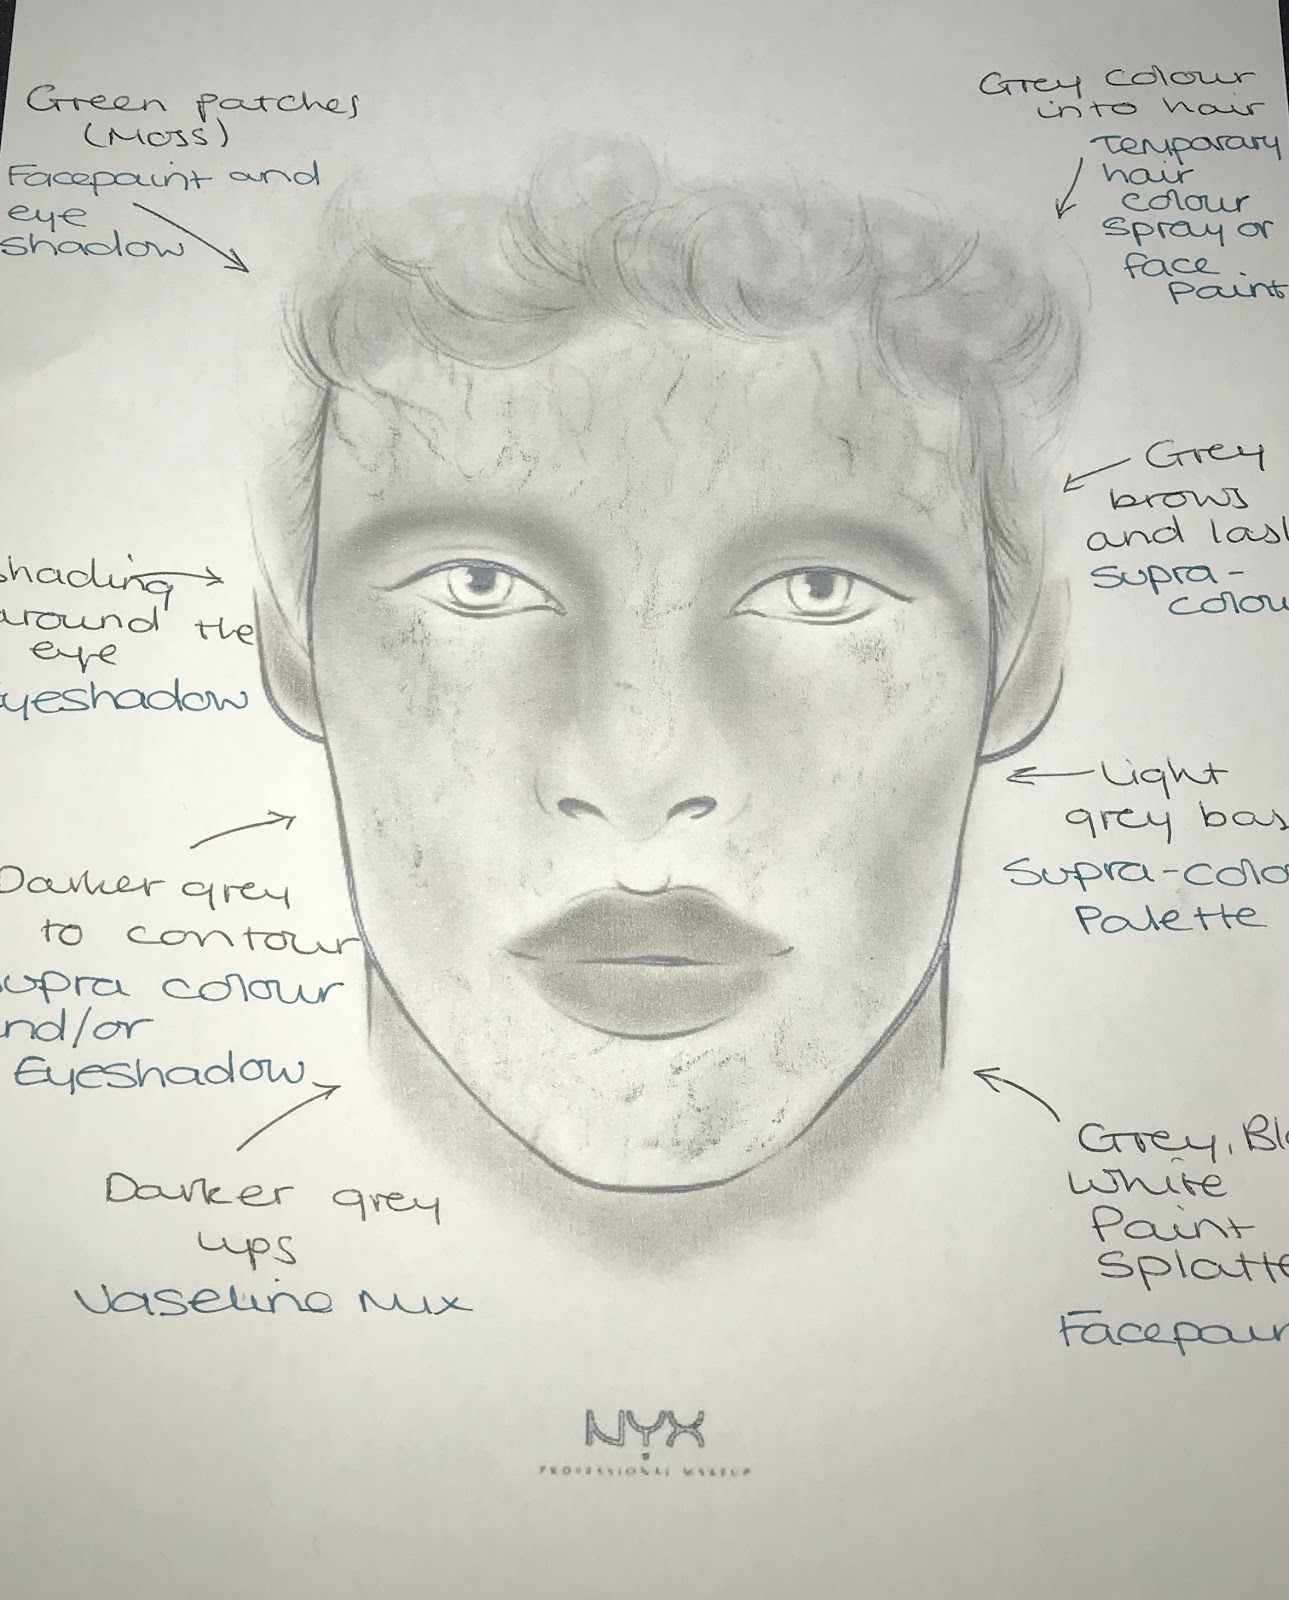
Below, are my final, developed hair and makeup designs, that were used for reference during my final assessment.
As you can clearly see in the image above, I have added multiple aspects to this deign since you last saw it, to ensure I have fully developed my initial idea.
*All of the additional techniques I have added, are written in green and purple*
I have developed this design by adding:
Fullers earth – To create a more realistic texture, and add extra colour
Prosthetics (faux Ivy) – To build the idea that this creature is living, and allow me to showcase another strong skill.
Moss – Further builds the idea that this creature is living, adding the extra detail will help me further create a realistic, rock-like texture.
Shading – Around facial features to help amplify the idea that this is a living creature, not just an ordinary statue.
I also made sure to adapt my initial design, dialling down the amount of paint splatter to ensure focus is drawn to the greenery, not the splatter.
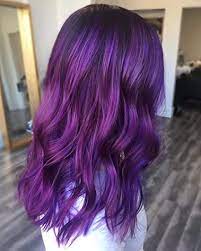
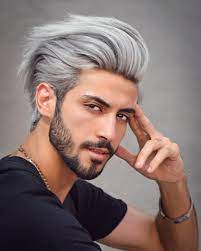
Above, is a reference image I used when creating the hair.
I chose this image specifically, as the hair is made up of multiple shades of grey, therefore, perfectly represents the look I am aiming to create.
Here is a collection of all of my practice work, leading up to my final assessment.
General skill enhancement :
World Skills
This year I entered the world skills commercial makeup competition, the theme was “Its a wild life.” As previously mentioned in my project proposal, one of the biggest targets I have set myself for this project was to ensure I pushed the boundaries of my briefs, allowing me to really explore the creative side of makeup.
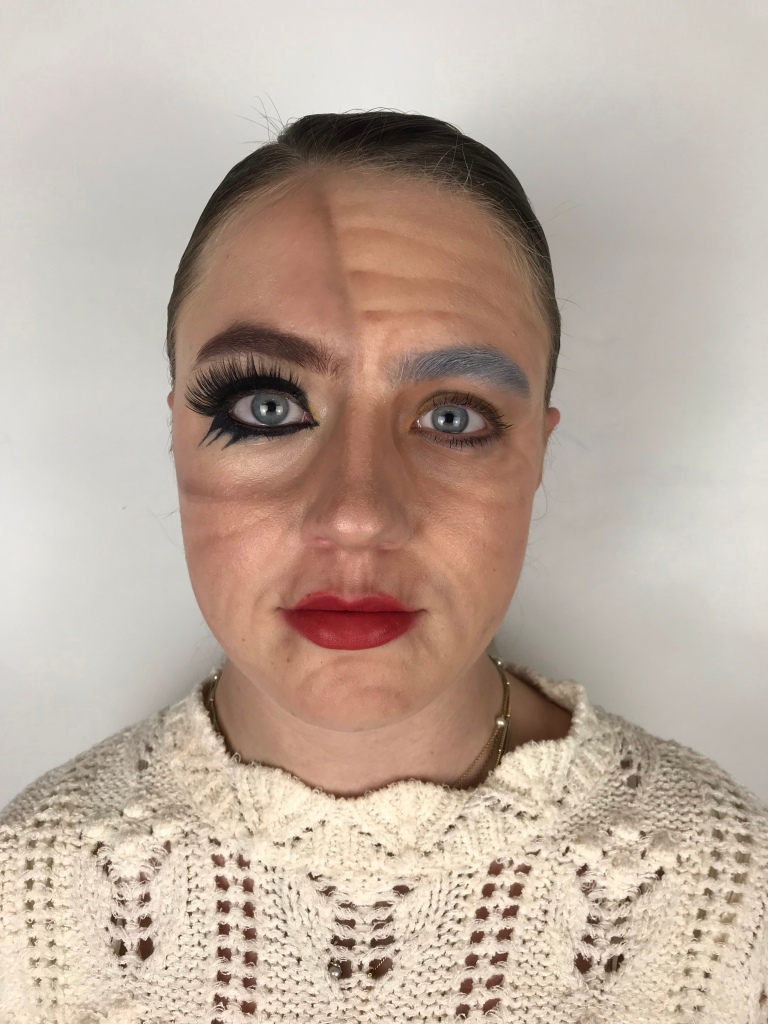
As you can clearly see in the photo below, I ensured to meet this target, by really exploring this brief, and what it could potentially mean. Rather than sticking to my initial thoughts of wild animals, and animal prints, I decided to look in to the idea that you don’t really know anybody, or what they have been through upon your first meeting.
I created a look representing an older woman, looking back on her younger days, and reflecting on all the ‘wild’ things she has experienced, and achieved.
I am extremely impressed with the finished result of this look, and love how my attention to detail really paid off in the end, as the ageing makeup looks brilliant.
Furthermore, I had many compliments on this look, including someone asking me if the wrinkles were a prosthetic piece! This helped to really build my confidence in my line and shadowing work, which I am really happy about as I love creating intricate details by hand.
Body Painting
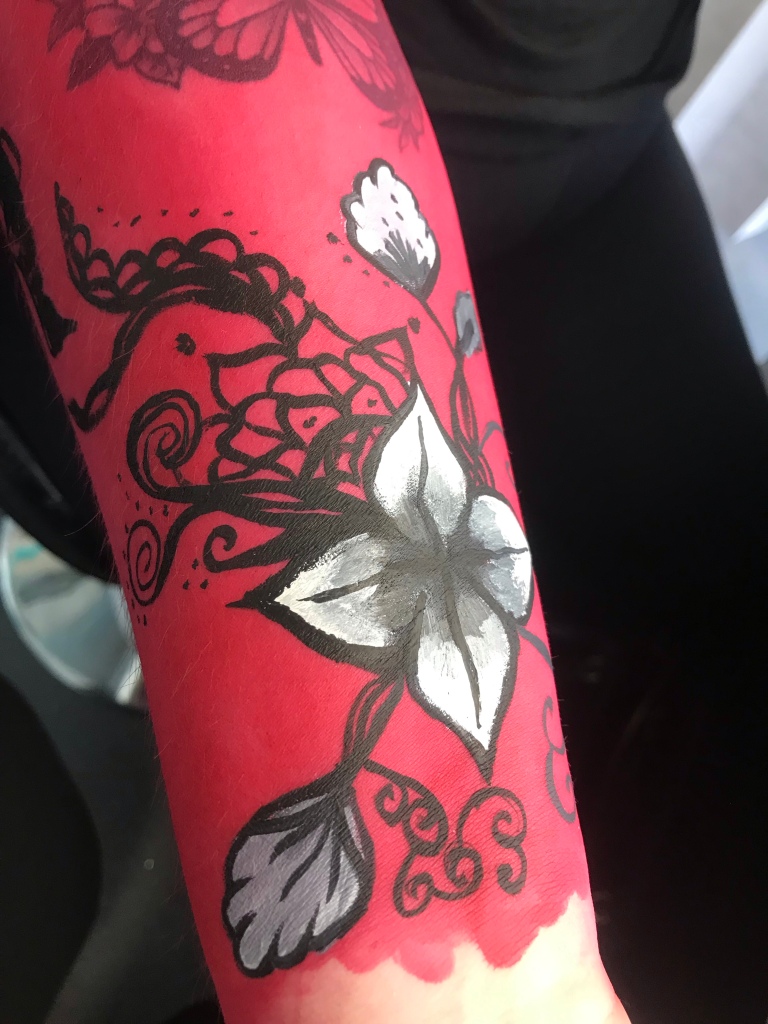
The image below is a design I created during a body art lesson at college. I decided to create a more intricate design, as I love line work – as I have just mentioned!
I also decided to experiment with using a more simplistic colour palette for this look, combining blacks, whites and greys together, and testing multiple blending techniques. This helped to build my knowledge ready for creating my final image.
Firstly, I am so impressed with how flawless this base application was. I mixed the paints to a creamy consistency, and then applied them to the skin with a brush. Next, I used a damp sponge to completely blend the product, ensuring there were no streaks. This technique worked really well and I will most definitely be using this in my final assessment.
Being a perfectionist, the appearance of the dots irritates me, as they are not all even. Therefore, if I created a look like this again I would use the handle end of the brush, rather than the bristles, to ensure all of the dots looked the same. Alternatively, I could also use a cotton bud to create the same effect.
Heated styling
Below are some hair styles I have created to aid in developing my skills in heated styling.
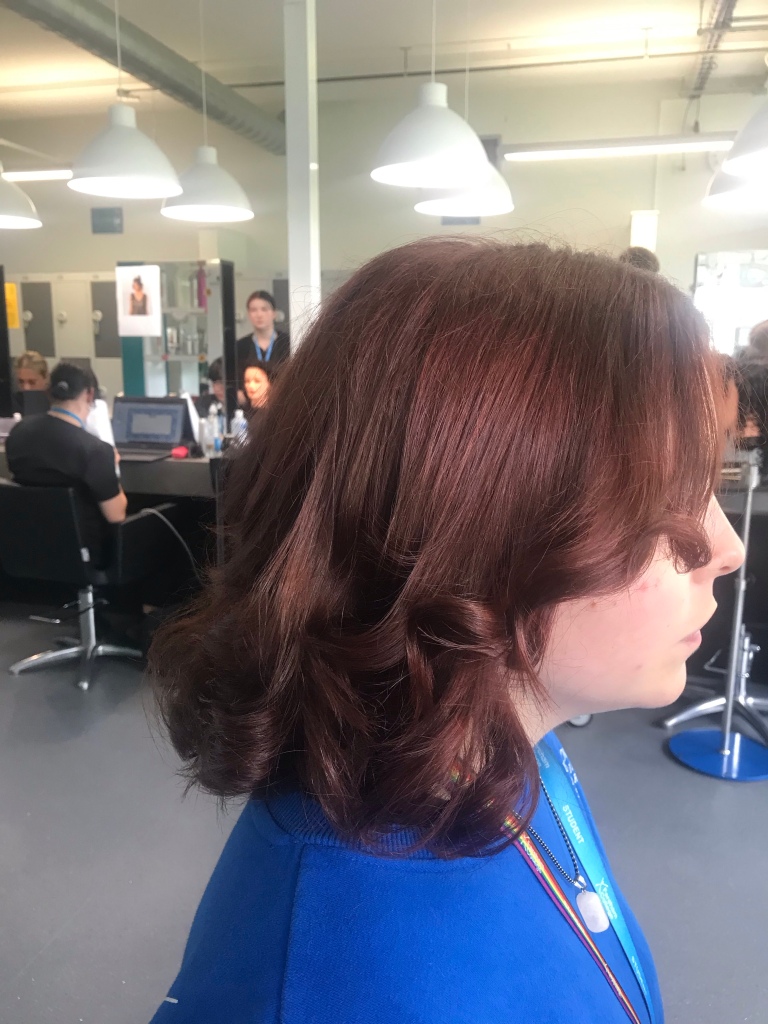
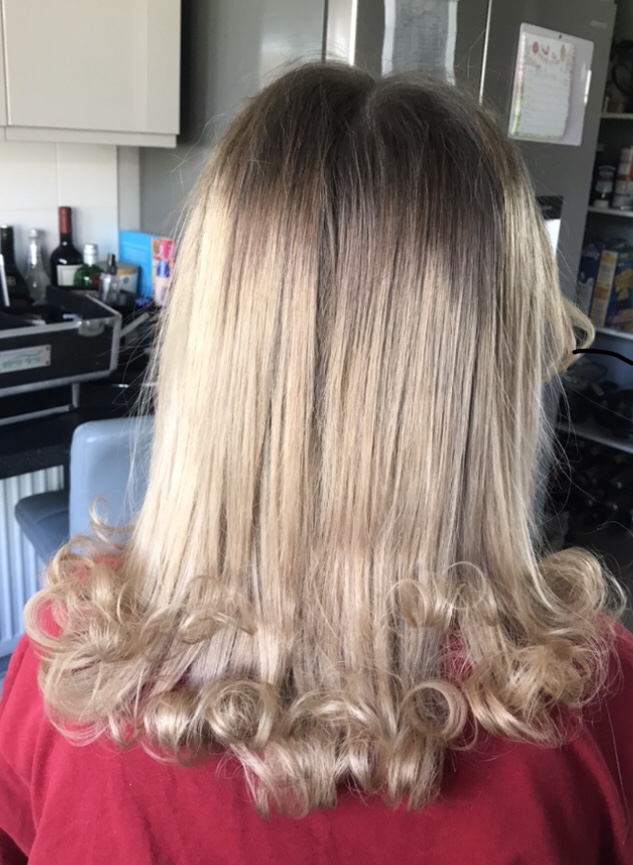
Firstly, I have a photo of a curled brush blow dry I completed in a lesson at college. I am extremely happy with the result, especially as I have never created this style on such short hair before, so was unsure of what the outcome would be like.
It was especially nice to see how happy my client was with this hairstyle, especially when she told me this isn’t a style she would have tried on herself but she loves it so much she will definitely be re-creating this look often.
Additionally, the photograph below shows a look I created outside of college.
Using hair straighteners to flick the hair out, I created a 1950’s inspired hair style. I am so happy with the overall result, however, if I was to create this look again I would ensure all the flicks were level, as some are higher up the head than others.
Hair styling
Below are some photos of some hair styling development I have crated during my time at college.
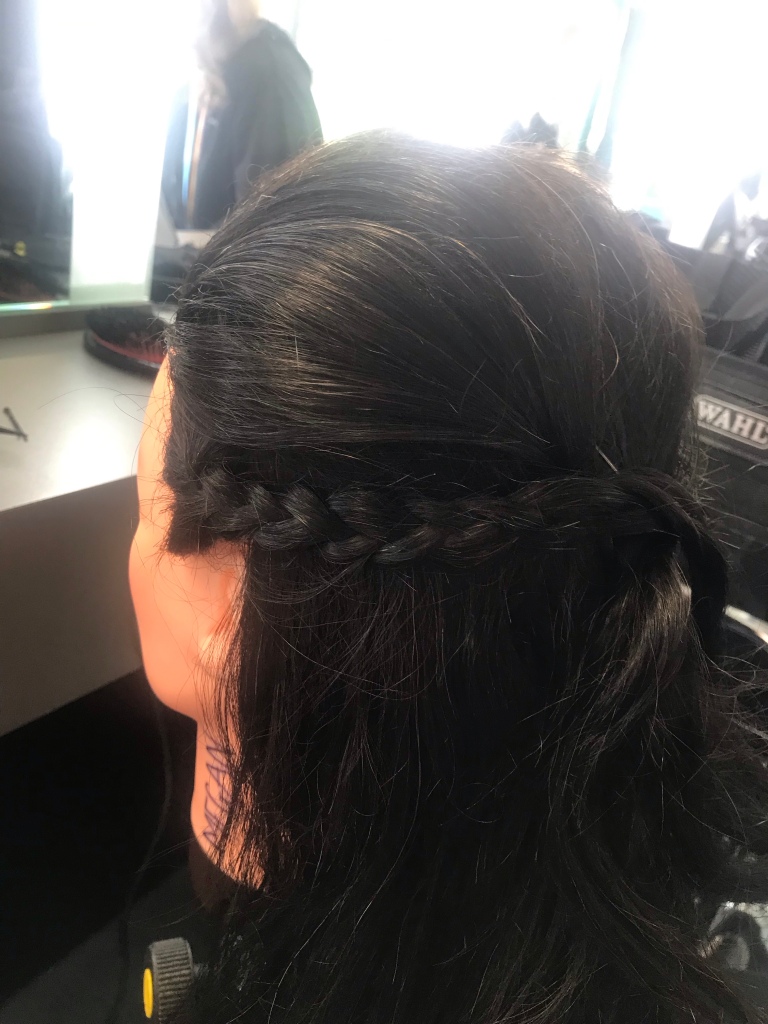
This first image is of a trial run I created for my fantasy hair style look.
I used back combing to create a small beehive with the top section of hair, curling the underneath, and braiding two sides to join at the back. I am really pleased with the end result of this look and wish I had brought in the faux plants to help truly represent my idea.
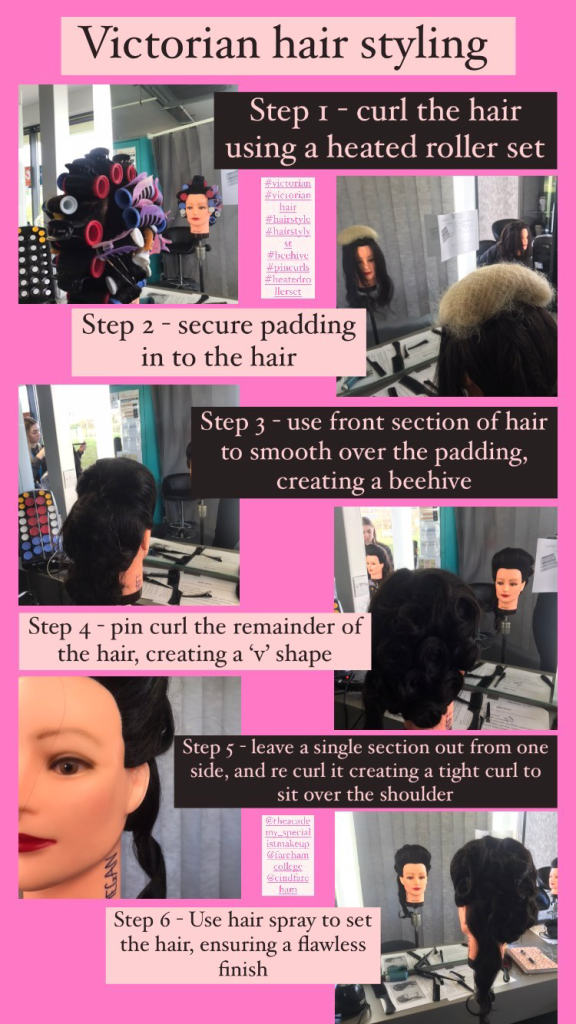
Next, I have attached a photo of a step by step guide I created, on how to re-create a Victorian inspired hair style.
This lesson helped me to combine multiple techniques together, creating a more complex final image.
I have never done anything like this before and absolutely loved learning how to combine the techniques I have learned thought the year. This helped me start to think about how I could create a more complex hair plan for the female version of the statue makeup, had I chosen it for my final design.
Design practice
Vampire makeup
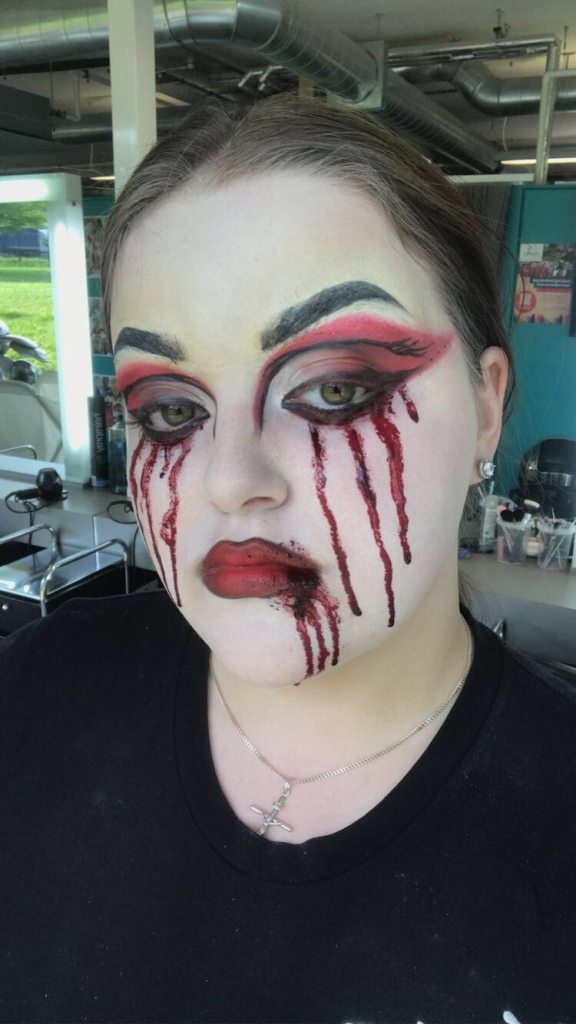
Below, is an image of a trial I created of my vampire design.
I am happy with the overall look, and feel I have represented my design well.
However, I blocked out my brows for this look and as I used a white foundation, you can still see some yellowness, from the colour corrector, around the eyes. Therefore, if I was to re-create this, I would spend more time on covering the brows, to ensure no product would pull through. I would also use a higher coverage foundation.
Despite this, I am happy with the overall look, and I am so impressed with my symmetry on the line work, including the eyeliner and drawing on the brows.
Although I like this look, It confirmed the worries I had when designing this look, as I don’t feel like it immediately portrays fantasy, but rather represents the horror genre.
Formative assessment – Stone creature
Below is a photograph from my formative assessment ( assessment practice), and my first full trial of the stone giant makeup. This look was a very much trust the process, as at various points in the making of this I was really unsure on weather I would like it.
However once the look was finished and had all tied together I knew immediately that I would use the male version of this design for my FMP, instead of the female. Despite my concerns when designing both looks, I feel the male look if far more effective.
During my final assessment I will ensure to add props, prosthetics, and additional techniques, to further develop this design. This will allow me to showcase my work at it’s full potential, and show I am willing to continuously develop my work.
I also must ensure that in my final assessment I bring the paint right up to the water line, as well as in to the ears, and around the back of the neck.
For this section, I must discuss any health and safety processes and considerations that will be used when bringing my design to life.
General health and safety
Below I have summarized some important health and safety considerations that are used when creating any look. There is a more in detail section on general health and safety rules under my units 3 and 4 tab.
Client consultation:
Client consultations are extremely important as they allow you to rule out any contra-actions that may prevent or restrict a treatment, as well as allowing you to become aware of any factors to consider when choosing products (occasion, venue, lighting, age, lifestyle, skin types) and gain a clear insight into what your client wants (makeup trials are also extremely useful for this.)
Furthermore, consultations allow you to book in patch tests, where needed. If using a product that is likely to cause an allergic reaction, a client must have a patch test 24-48 hours before their treatment to ensure the product is safe for use on them. A consultation also allows time before a treatment for a client to obtain a medical consent letter, which may be needed in rare circumstances.
COSHH
Meaning – Control Of Substances Hazardous to Health.
COSHH is a law that requires employers to train all of their employees on how to safely use, store and dispose of any substances that could potentially cause harm. This law also requires establishments to own a COSHH cupboard in order to safely store these materials. A COSHH cupboard should be hidden away from the public eye, and should be made from metal and kept locked at all times. All of this is in place to hopefully prevent harm to staff, clients or members of the public.
PAT Testing
Meaning – Portable Appliance Testing
PAT testing is a way of testing electrical equipment, in order to ensure it is safe for use. These tests should be renewed every 6 months, by a professional firm or trained individual. Even though these checks happen regularly, and therefore there should be no problem in between, employers and employees are responsible for carrying out visual checks on equipment before and after use, to ensure there is no visible damage. If a piece of equipment does happen to be faulty, it should be disposed of correctly.
PPE
Meaning – Personal Protective Equipment
PPE is used to prevent damage to a person, or a person’s belongings, as well as preventing cross contamination. Here are some examples of PPE that may be used in a salon, and their purpose.
Gloves – Helps protect the therapist from developing contact dermatitis and prevents cross contamination.
Apron – Worn by staff to protect their skin and clothing.
Gown – Worn by a client to protect their skin and clothing.
Mask – Prevents contraction or transmission of airborne diseases, and prevents inhalation of potentially harmful products.
Visors/Goggles – Prevents fluids from entering the eyes, therefore protecting against cross contamination. Also prevents any sharp or potentially hazardous products entering the eye area.
Preparation of the work space:
Below I have listed some of the important steps to take when preparing the work space for a client.
Sterilize all equipment – using products such as IPA and/or Barbicide.
Cleaning the work using the correct cleaning products.
Complete a visual check on all products and equipment.
Clearly lay out products on your workstation.
Label any unlabeled products.
Ensure all electrical equipment is turned on in good time, allowing it time to heat up.
Turn on the lights around your work station.
Prepare the photographing station to ensure you appear organized.
Adjust the chair height, to prevent causing a strain injury.
Personal hygiene:
Staff must be wearing clean, ironed uniforms.
Clothes sizing must be unrestricted, allowing the therapist full movement.
No overpowering odor should be let off by the therapist ( No bad smells, No overpowering perfumes)
If a member of staff smokes, they must ensure they do not smell like cigarettes during a treatment.
Staff must have clean and tidy hair and nails.
Long hair must be tied back out of the face.
Nails must be kept at a manageable length. If painted, you must ensure there are no chips in the polish as they can harbor bacteria.
Aftercare:
A therapist must educate their client on any potential contra actions, explain signs, symptoms and what to do. This should be spoken about, and the information must also be given either via a leaflet, or a pinned social media post on the business account.
Advise a client to continue a healthy, balanced lifestyle to ensure their hair, and skin is always at its best.
Talk about when is a good time for a client to re-visit, if regular appointments are wanted/needed.
Educate the client on how to correctly remove products.
Unit 8 Specific health and safety considerations
Below is a list of products and equipment I may be using during my assessment for my FMP, and what I must consider when doing so .
Face paint – Check all ingredients to ensure a client is not allergic to any of the contents, carry out a skin sensitivity test.
Eyeshadows – Ensure to tap excess product off of the bush to prevent any product entering the yes, or being inhaled. Do this while facing away from your client.
Cream foundation – Check all ingredients, and ensure the product is suitable for the clients skin type.
Loose setting powder – Don’t apply too much product, as inhalation could be dangerous. Similar to eyeshadow, if applied with a brush ensures to tap off excess, facing away from the client.
Primer – Check ingredients, and consider what is suitable for a client’s skin type.
Setting spray – Consider any medical conditions. If a client is asthmatic it would be more suitable to use a water based setting spray than an aerosol spray.
Mascara – Ensure the client doesn’t have overly sensitive eyes, and always check the ingredients.
False eyelashes – Consider how well they will fit the eye shape, and therefore how comfortable they will be for the client.
Eyelash glue – This product should always be Patch tested for, and you should always check the ingredients before use.
Lip products – Consider the consistency of the product, and how suitable this will be for the clients lip shape and type.
Eyeliner – Ensure a client doesn’t have overly sensitive eyes, ensure they are comfortable; and always check ingredients.
Temporary hair color – spray – This may not be suitable for use on a client with asthma
Temporary hair color – chalks and powders – These products would be more suitable for someone with respiratory problems
Curling iron – Must have an in date PAT test. I must complete a visual inspection before use.
Hair bands and grips – Must be fully intact, with no sharp edges.
False flowers – Must not be damaged, or have any sharp corners.
Makeup brushes/tools – Must be thoroughly cleaned before and after every use, with IPA.
I must have a pot set aside, so if I happen to drop any tools, products of equipment on to the floor, I can keep them separate from the rest of my products.
Prosthetics – If applied, prosthetics must be removed correctly, using MME.
I must ensure I set my clients chair at the right height, to prevent causing a strain injury.
I must use an antibacterial spray to wipe down my work station before and after each use.
Here I have documented all of my hair and makeup designs, from my initial, to my final ideas.
Below are my three initial makeup ideas I created for this project.
Design 1 – Robot/alien
One of the first designs I thought of when given this brief, was to create some kind of alien. I didn’t want to stick too closely to the typical appearance in film and tv, therefore combined some elements of a robotic look. Personally I love this design, but the more I think about it I feel this is less fantasy and more sci-fi. Although I initially put sci-fi down as something I consider fantasy, after thinking harder I think it is very much an area of its own.
If I was to create this look, I would either apply a bald cap and carry the makeup right across the head, or apply a purple wig. When using a wig, I would create some braids thought the hair, and loosely curl it, to add extra definition. I would also keep the hair very slicked down, and not add too much volume, as this makes the forehead appear larger which I feel is a key alien feature.
Design 2 – Vampire
When thinking of how I could further push the boundaries of this theme, I thought of creating some kind of supernatural figure. After some consideration I decided to design a vampire inspired look. Once again I really like this look but the more I look at it I feel it would fit better into a horror, or even drag theme – as the look I created was gory but glamorous. As mentioned in my introduction I am challenging myself to push the boundaries of this topic so I decided to think even harder about what I wanted to create.
When thinking of vampires, I immediately in-vision long dark hair, with light (grey or white) highlights. Therefore, if I was to create this look , I would either use a wig, or temporary colour, to create this style. I would then combine multiple techniques to either create a volumised side part, as shown in the image above, or a beehive.
Design 3 – Living statue
Finally, I settled on the idea of creating a stone creature/ living statue. I loved this idea as I feel it is very different to the looks that everyone else is creating, and I feel it really emphasizes how hard I have tried to think outside the box during this design process. Although these characters are not seen often, I believe they really clearly build the idea of fantasy, by turning inanimate objects into living beings. I also believe I could use more techniques when creating this look, than any of the others, making it the perfect opportunity to showcase all that I have learned throughout the year.
If I created the female version of this design for my final major project, I would create a hair style similar to the photo above. The soft curls and chunky braid would help to amplify the kind, soft nature of this creature, meaning the hair would play an important role in my final image. I would also braid faux plants in to the hair, to help build the overall effect of my makeup.
To further develop this idea I have also created this design on a male face chart. To help with the developmental process I am going to trial this look on both male and female models, to see which I prefer. From looking at the face plans I prefer the look of the male design, but know that I could incorporate even more hair and makeup techniques into the female design.
When creating the male version of this look, I would keep the hair quite simple by using gel or hairspray to slick it back. Furthermore, I would use temporary colour to make the hair grey for the final outcome. I would chose to keep the hair style simple, in order to ensure the main focus is on the makeup itself. As male hair is likely to be shorter, this will also allow me to add accessories in to the hair without hiding a style I may have created.
For this task I must complete a performance and character breakdown to identify any visual and/or practical requirements that I should include in my hair and makeup designs.
Korg
Korg is a character in the marvel universe, first introduced in the comic book – Journey into mystery #83. He is a Kronan warrior, who has much more to offer than first meets the eye. I have chosen to complete a character breakdown of Korg, as not only does his appearance fit with the look I am wanting to create, but the character itself is exactly what I am wanting to portray in my look.
Upon first appearance, Korg appears to be brute, fierce, intimidating and strong. However his character has a much more sensitive, kind hearted and humorous personality, beneath his hard surface.
Background:
As previously mentioned, this character belongs to a group known as the Kronan’s. Kronan’s are an ancient race of rock-like humanoid beings that wield superhuman physical abilities.
Korg has superhuman strength, with the ability to knock back even the strongest of opponents in one hit, as well as great durability and stamina, allowing him to partake in long battles. Furthermore, Korg is highly skilled in combat, and is a great marksman, making him a great addition to any team in a battle. These skills allow Korg to play an extremely important role in protecting those around him.
Despite all of this, Korg was forced to participate in the grand masters contest of champions. This helps to build the impression that there is a much softer side to Korg’s character. As, despite his intimidating appearance, Korg was pressured into something against his will.
Additionally, Korg helps Thor and Hulk escape from Sakura and then joins them and the Asgaurdian’s on their journey to earth. This further helps build the idea of this character’s kinder nature, as he is not just expecting to lead them, because he helped them.
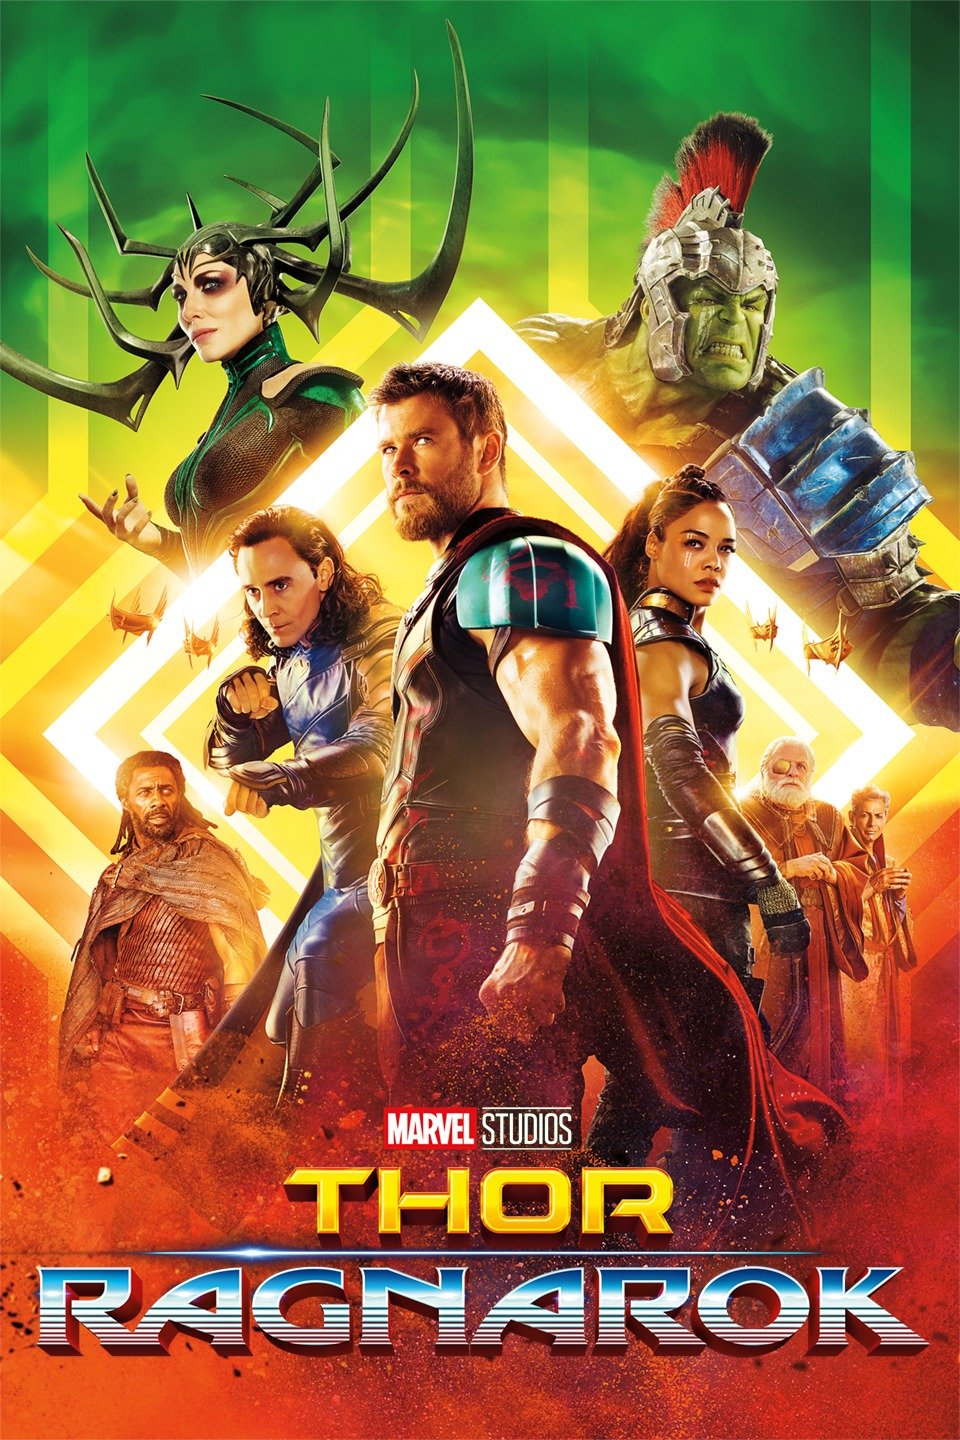
Below are some quotes from the movie Thor – Ragnarok, to help show how this characters’ kind nature is evident through his words and actions, despite his appearance.
“Over here. This pile of rocks waving at you. I’m actually a thing. I’m a being. Allow me to introduce myself. My name is Korg. I’m kind of like the leader here. I’m made of rocks, as you can see, but don’t let that intimidate you. You don’t need to be afraid unless you’re made of scissors! Just a little Rock, Paper, Scissors joke for you.” ―Korg to Thor
Here, Korg introduces himself to Thor, in a bid to comfort him, and ensure he is not intimidated by his initial appearance. This helps to show that Korg is aware that he may appear intimidating, or frightening upon first glance, but wants to ensure that those around him are comfortable, and know he really has a kind heart. Furthermore, the joke at the end shows his humorous side, proving his character is much less serious than you may expect.
“Ah, yuck, there’s still someone’s hair and blood all over this. Guys, can you clean up the weapons once you’ve finished your fight? Disgusting slobs.” -Korg to Thor and Hulk
This shows that little inconveniences bother Korg, helping to imply that he has a sensitive nature. Upon first glance his character may appear fierce and strong, but if Korg was really as fierce as he seemed, I’m sure seeing messy weapons wouldn’t bother him,but may rather satisfy him. Furthermore, he is complaining about the situation, but ensures to drop in some humor, ensuring the others don’t feel afraid.
“The damage is not too bad. As long as the foundations are still strong, we can rebuild this place. It will become a haven for all peoples and aliens of the universe. Oof. Now those foundations are gone. Sorry.”―Korg to the Asgardians
Furthermore, this proves that despite his initial appearance, Korg is a kind hearted character, who is loyal, and cares about those around him. Following an attack, Korg is keen to show the people of Asgard that hope is not lost, showing he looks for the positives even in the darkest of times. This also makes his loyalties to Thor even more evident, as Korg helps Thor’s people in a time of need.
T-“Every time I threw it, it would always come back to me.”
K-“Sounds like you had a pretty special and intimate relationship with this hammer, and you losing it was almost comparable to losing a loved one.”
Once again, this quote helps to amplify the kind heartedness of this specific character. The way he describes the relationship between Thor, and his hammer, helps put into perspective how Korg really does have a kind heart, and finds the most positive and gentle ways of helping people, despite his brute, intimidating appearance. This creates the idea of Korg being a gentle giant.
In an interview, Taika Waititi (the actor who voices Korg) stated, “We wanted to change the idea of what a hulking guy made of rocks could be. He’s huge and heavy, but with a light soul. We wanted to make him funny and a relatable entry point into this world. And Thor needs friends”. This proves my interpretations of this character’s actions to be correct, as the intention of this character was to break certain boundaries and expectations.
Therefore, I have chosen to use this character for inspiration when creating my final designs. As previously mentioned I love how this character is evident when first seen, but it’s appearance can be deceiving, making this a great opportunity for me to explore how using different products and techniques can help me portray the true nature of a character.
Fun fact ; When idle, Korg grows moss, helping to build upon the idea that he is a natural element that will age. Thai also adds another human feature to him, as the moss helps to imply he is aging.
For this task, I must create a timeline of events throughout the last decade, that help to support my chosen subject.
I have created a timeline to showcase some of the most influential tales, that have helped build this idea, and bring the theme in to the mainstream.
1812 – Brothers Grimms’ – Grimms fairy tales – Our first introduction to some of the most popular fantasy tales ever written. These tales have had countless modern adaptations, and are still told today.
1858 – George McDonald – Phantastes – A tale of a man being dragged into an adventurous dream. This Tale is considered one of the first of its kind.
1865 – Lewis Carroll – Alice in wonderland – This was not initially considered to fit under the fantasy bracket, as many aspects of this story could be compared to realistic happenings.
1886 – William Morris – The Well at World End
1900 – L. Frank Baums – The Wonderful Wizard of Oz
1904 – J.M.Barrie – Peter Pan, the boy who couldn’t grow up.
1937 – J.R.R. Tolkien – The Hobbit
1937 – Detective Comics #1 – The first installment of the Dc universe, which has rapidly grown into a multi-million pound franchise.
1939 (-present) – Marvel Comics No.1 – The first marvel comic book ever released, introducing the marvel universe to the world. Since then, this universe has continued to expand, earning billions of pounds, and an extensive fan base across the whole world.
1944(-1955) – J.R.R. Tolkien – Lord of the Rings – This tale is now considered one of the first ever high fantasy novels, which highlighted the fantasy genre, leading to its introduction into the mainstream of media.
1950 – C.S.Lewis – The Chronicles of Narnia
1963(-present) – Dr Who – One of the first majorly popular fantasy TV shows, so popular in fact that it’s still running after almost 60 years!
1964 – The Adams family – A family film based on a supernatural family. This is one of the first times the supernatural subgenre is introduced to a child friendly setting.
1977 – Terry Brooks – The Sword of Shannara – This was the first fantasy novel to appear in the New York Times ranking of paperback best sellers.
1996 – George R.R.Martin – A Game of Thrones
1977(-2007) – J.K.Rowling – Harry potter – This series of books is now the best selling collection of novels, EVER !
1980 – The Indian in the cupboard – Considered one of the first films of its kind, introducing low fantasy to the movie scene.
2001 – Dead until death
2001(-2003) – Lord of the Rings books are adapted to screenplays. These become hugely successful and once again help to draw attention to this theme in the mainstream media.
2001(-2011) – J.K.Rowling’s Harry Potter novels are adapted into movies that become one of the most successful movie series in history, even getting its own studio tour attraction !
2003 (-2017) – Pirates of the Caribbean – One of the most successful movie series of its kind, taking place in a fictional historical setting, using pirates to represent freedom from ruling powers.
2009 – The Vampire Diaries – One of the most popular supernatural series, TVD helps introduce the fantasy theme to a wider audience.
2009 – Avatar – This movie is so well known, in fact almost every person I have spoken to about this genre has brought it up, making it, in my opinion one of the most well known fantasy films.
2011(-2019) – Game of thrones – Goes on to become one of the most successful tv series in history, wins multiple awards and even gets a spinoff series, House of the dragon.
2012 (-2014) – The Hobbit novels are adapted into movies, as a follow up from the success of the Lord of the Rings movies.
2013 (-present) – American Horror Story – A hugely successful series created to combine fantasy and horror, in a bid to unnerve the viewers. Although very unnerving, the fantastical storylines keep viewers hooked, and constantly wanting more – hence why new series are still being produced!
2013 – Frozen – Much like all Disney movies, frozen was and still is an extremely popular family movie. However this movie tops the charts, taking first place when being named the most successful fantasy movie ever made.
2016(-present) – Stranger things – Combines many elements of the fantasy film, to build an extraordinary story line, gripping millions of people world wide.
2016 – Suicide Squad – this movie combines fantasy and comedy to create a superhero film aimed at an older audience.
2018 – Mortal engines – One of the most successful fantasy films of this year, Mortal engines brought popularity back to this kind of story.
2020 – Fantasy Island – A combination of fantasy and horror, created to unnerve its audience, this movie is set on an island where anything is possible.
2021 – Mortal Kombat – Initially a video game, this movie was adapted to introduce a new audience to this genre in film and tv.
2022 – Morbius – This movie takes an unexpected turn, as it is based on the origin story of a villain, instead of a hero.
For this task I have been asked to explore the historical background of hair and makeup designs, created for the theme, fantasy.
Fantasy is a word used to describe a genre that covers many subjects. In theory, this theme has been around for as long as man- as since the beginning of time all cultures have had their own myths, and folklores. However, fantasy didn’t officially become recognised as its own genre until the late 19th/early 20th Century, when writers began to further push the creative boundaries of literature.
Before fantasy was officially known as its own genre, many fantasy tales were put under different themes, such as romance. Even Though today these tales may be considered direct fantasy novels, at the time some elements of these stories would be considered somewhat believable, therefore were not known as fantasy. Now, we consider fantasy to be a bracket term covering many subjects that are either unbelievable, or only half believable (anything that wouldn’t happen in the day to day reality of life). However, in the past people seemed less keen to push the boundaries on what could be real, and wrote tales about realistic happenings, with fantastical elements.
Personally, I think it is hard to believe that the fantasy genre has only been recognised as its own term in fairly recent history. Looking at the wide range of fantasy novels, films and tv series that are created today, it is hard to believe that the genre didn’t even officially exist not so long ago. Even since this genre was first given the recognition it deserves, it has been widely expanded. Fantasy started as a subgenre of subjects such as romance and thriller, but now carries its own list of subgenres such as ;
High/Epic fantasy – Set in a magical environment that has its own rules and physical laws.
Low fantasy – Set in the real world, containing certain unexpected magical elements (plastic figures/toys coming to life)
Magical realism – Were characters accept certain fantastical elements as a part of their otherwise realistic word (levitation, teleporting)
Sword and sorcery- Combines the ideas of fantasy and horror in the hopes of unnerving or frightening it’s audience (monsters, creatures)
Fables – Personified animals and the supernatural, used as characters to impart moral lessons
Fairy tales- Aimed at children, based in distant magical worlds where anything that happens is accepted as normal in that setting.
Superhero fiction – Where a hero (or villain) obtains special abilities through scientific means.
In this post, I will begin to explore and justify my initial ideas for my given theme.
For my unit 8 final major project, I have been given the theme fantasy, and asked to create a hair and makeup design showcasing my best skills. I am extremely excited to be working with this theme, as fantasy is such a wide bracket meaning I have many options to explore.
When I think of fantasy, the first things that come to mind are elves and fairies, living in lands far, far away. One of the biggest targets I have been working towards, is to be more creative with my designs, and push the boundaries of themes, by taking briefs less literally. Therefore during this unit I want to ensure that I really think about what fantasy could mean, and create something unusual, rather than immediately sticking with my first thought. More importantly I want to make sure my work differs from that of my classmates, and I feel like many people would have had the same immediate thoughts as mine (of fairies, princesses and lands far away)
To me, a fantasy is anything out of the ordinary, that could not be real. Whether it be a dream, or an idea someone explores in order to take a break from the realities of life, I think fantasies are a way of people expressing their raw emotions, from joy to fear. Furthermore, I think many people initially think of all the happy endings in fairy tales, but I believe there is also a more negative side to fantasy too (certain aspects of the paranormal world, the idea of monsters, villains and mutants are prime examples of this.) This is definitely something I would like to explore when creating my designs, to ensure I am pushing the common boundaries of this theme.
Here is a mind map I created, consisting of my initial ideas for this theme. This will be explored in more detail during my research.
For this task, I must complete my initial research in to fantasy hair and makeup designs, and explore their performance suitability.
The looks we create for our Final Major Project will be professionally photographed on the day of our final assessment. This means that our looks must be suitable for a studio environment, under bright lights. We must also ensure that all minor details are perfected, as a HD camera will pick up any and every imperfection. These looks will then be created again, for our end of year showcase at college. This is an event that enables us to showcase our strongest skills, and the potential we could bring into the industry as an artist. In the showcase, we will walk a runway alongside our models meaning we will have to adjust our looks, as this time they must look good from afar, and our model must be comfortable for long periods of time.
Therefore, in this task I am going to compare different styles and techniques I could use to create my initial ideas, and evaluate how suitable these would be for a photoshoot, and a runway environment.
Below I have created a table comparing the factors to consider, when creating a look for each of these environments.
Photoshoot
Both (in common)
Runway/Catwalk
Close up shots – Pay attention to minor details, don’t over exaggerate features. Costume and props are not a necessity. Poses – Essential to ensure a great final image. Exposure – You must be aware of what camera, and or settings being used in order to ensure the makeup is created effectively. Story – Final image should tell a story. Time – Any heavy or uncomfortable aspects can be added last minute to ensure you create the desired look, as well as making sure your model is comfortable.
Lighting – Natural, Stage lighting, white light, coloured lights. Audience – The look must be catered for the audience, its story must be clear. Confidence – Is KEY ! The model must feel confident enough to pose for photos and walk a runway, without the final image being hugely affected.
Viewed from a distance – Must be dramatic enough to be seen, emphasize details to make them stand out. Costume and props must be used to finalize the look. Body language – Facial expressions and walk must match the character. Story – Look must be obvious, there is not enough time for people to think too much about the backstory. Time – The hair, makeup and costume must be comfortable and unrestrictive for the model, ensuring they are comfortable to wear this while moving, and over longer periods of time.
My first initial idea is to create a living statue. I am leaning more towards using this idea as my final outcome as it is different from the typical fantasy looks that are commonly created. Furthermore, I love how this overall look would be simple but effective upon first glance, however I can incorporate many techniques to ensure I am showcasing my work to the best of its ability.
Makeup
Option 1 – Hand painting
Below is an image of a living statue look that has been previously created, using only hand painted effects.
When creating this look, my first option is hand painting all the details myself. Although this may be more time consuming, I personally love creating all the small details by hand and therefore think I am more likely to use this method anyway. Regardless of what I prefer, personally I believe this method is more suitable for both the runway and a photoshoot. Hand painting the look ensures the model is fully comfortable throughout the process of the photoshoot, and the day of the runway, where the model will have to wear the look for a long period of time. Furthermore, this method helps to further ensure a smooth overall finish in the photographs – as if prosthetics are not blended seamlessly in to the skin, the camera will highlight this flaw.
Option 2 – prosthetics
Below is an image of a sone creature look, that has been previously created, using prosthetics.
Although this image tells an incredible story, using prosthetics will be much more effective for film and tv work. As I mentioned above, using prosthetics could negatively impact the overall final image, as if the prosthetics were not blended seamlessly into the skin the camera would amplify this, drawing attention away from the overall design. Furthermore, wearing prosthetics like this would be extremely uncomfortable to wear for a whole day. This technique would be perfect for looks created for film and tv, as although they would be on for longer periods they would be constantly in use. However during a runway there is lots of waiting around, and therefore the model is likely to be uncomfortable.
Hair
Option 1 – accessories
One of my options when creating the hair style for this look, is to keep the hair fairly simple, while adding in accessories. I personally believe this will be more effective than just creating a hairstyle on its own, as it further develops the character and supports my overall design. Adding in faux plants such as flower petals, ivy and moss, will help to amplify the overall makeup look, and its story. Furthermore, I think keeping the hair style simple will prevent any distractions from the makeup itself.
Option 2 – Updo
Additionally, creating a messy up do, and adding in accessories is another great option to support this look. However, I personally believe that the additional weight and pressure from the updo would most likely be uncomfortable for a model walking the runway. Therefore, I could consider creating this look for the photoshoot, and adapting my design for the showcase, as I believe that this would tell the story really clearly, making it the perfect addition for the photoshoot.
Option 3 – Bald cap
Bald caps always create a great overall image, however you must master the art to ensure that the finished result looks good on camera. Just like prosthetics, a camera is your worst enemy when using a bald cap, as if it is not blended seamlessly into the skin the camera will amplify the imperfections and draw attention away from the overall look.
Hair color
Option 1 – Wig
My first option when choosing how to color the hair is to use a wig. Wigs are a great way to quickly change up your look without having to commit to a certain style or color, therefore are a popular choice among designers when planning looks for photoshoots and runways. However, when on a lower budget wigs can ruin an overall look, as cheap wigs can look really fake. Therefore this would be a great option if I had the budget to purchase a real hair, high quality wig, but as I can not afford this I will most likely use temporary color products in the hair.
Option 2 – Temporary color
Products such as coloured hair chalks, gels and sprays, as well as face paints, are a great way to temporarily color the hair, with a quick removal. Semi-permanent hair dye could be used if a model is willing to partially commit to that hair color, however that may last up to 2 months ! Therefore, as a makeup artist I am more likely to use products such as chalks and sprays on a client or model, as they give a great effect, but will wash out as soon as you are done.
For this unit I had to keep a reflective journal, in order to ensure I can always refer back to any feed back I have gotten throughout this project.
In this post I have documented all of the Lecturer and peer feedback I have received for all of my practice work, leading up to the final assessment.
My own feed back is documented on a separate post (Practice photographs) under my Practical Outcome tab.
World Skills
Lecturer feedback – Natasha was extremely happy with the overall finished look, and how professionally I conducted myself throughout the process. She advised that maybe next time I made the liner on the left eye come down slightly lower, to create a more editorial effect.
World skills feedback – “Thankyou so much for participating in this years WSUK commercial make-up competition. Some interesting elements within your makeup and mood board that does support your overall application. The 60’s eye is well executed and the ageing makeup also nice aspects. However this is a commercial makeup competition but and interesting take.
Model feedback – Chloe-Ann loved the finished result, especially the ageing makeup. She said it was really strange to in vison how she may look when she was old, and was really proud of how well I did.
Peer 1 – ” I really love how you have re-created the same look on the elderly side, but have made sure it actually looks like an old person created it. You didn’t create a really bold and tidy look, as an old lady wouldn’t be able to do this. I think this helps to really bring your idea to life.
Peer 2 – ” Well done Megan this was absolutely brilliant work, you ensured to stay professional all throughout the process, ensuring to obide by all health and safety. Your overall look is great and you should be very proud. I also think it shows how open you are to feedback and constructive criticism as you took on board the feedback from your trial run, which helped really being the look together.
Body Painting
Lecturer feedback – Natasha complimented my smooth base application, and we agreed on the idea of trialling different techniques to create more even dots. Natasha was also really pleased with my line work, and the blending within the flower petals.
Model feedback – Abby was really impressed with how easy I found it to build up my colours, on top of the red base. She was also happy with the blending in the petals. However, she also said about using a different technique to create more even dots.
Peer 1 – ” I think this is lovely, and love how you have combined these colours together. This colour palette can be tricky to work with but you made it work exceptionally well”
Peer 2 – ” I love the line work and intricate detailing you have created in this look. I also love how you created an ombre effect in the flower petals, rather than just leaving them one colour. This really helps to show how willing you are to push yourself to your limits, especially as these colours must have been hard to blend together.”
Heated styling
Lecturer feedback – ” This is a beautiful finished bouncy blow dry, that has been very well executed”
Model feedback – ” This style is not something I would have particularly chosen for myself but I am so in love with how this looks, and will definitely be re-creating this on myself often.”
Peer 1 – ” These curls look amazing, I actually thought you had used a wand for this look. I also love the amount of volume you created at the root – it was just enough to prevent the hair from being flat, but wasn’t too overpowering, ensuring you didn’t take focus away from the curls”
Peer 2 – ” I think the finished result of this blow dry is lovely. I know how worried you were about creating this style on such short hair, but you did a great job. You also made sure to included the fringe in the style, which you have made blend in to the rest of the hair perfectly. Well done meg this is great”
Model feedback – ” This is exactly what I wanted, thankyou so much it is perfect. I feel like a princess!”
Peer 1 – ” Thankyou so much Megan, this is exactly the look Alyssia was going for and I can see how much she really loves it. You have made her day, thankyou again”
Peer 2 – ” This look is lovely, I think you brought her vision to life so well. I do agree with what your saying, in terms of next time you would ensure all the flicks were at the same level, but I do not think this takes any effect away from the overall finish.
Hair styling
Lecturer feedback – Natasha really liked this result, and said she loved how she could clearly see I am taking previous feedback on board, by ensuring to tame all fly-away’s. Natasha said she is really exited to see how this would look with all the accessories, if I happen to use this for my final assessment.
Peer feedback – ” This looks so lovely and I think it will work really well with your design, especially when you add the props.”
Lecturer feedback – ” You worked professionally throughout this lesson, ensuring you kept sound health and safety practice throughout. The overall finish is great for a first attempt, but to meet the industry standards, pay close attention to the small details, by ensuring none of the bobby pins can be seen.”
Peer feedback – “Your overall finish was very neat and tidy, you ensured all of your pins were tight, but maybe work harder on making sure they are not visible “
Vampire makeup
Lecturer Feedback – Natasha was really pleased with this look. She was especially impressed with how well I blocked out my brows, and how symmetrical all of my line work was. However, she did advise that I either use a lighter colour to colour correct my brows, or a higher coverage foundation, as the orange does pull through around the brow area.
Peer 1 – ” This look is amazing, I love how you worked with such a small colour palette, but ensured the overall finish was not dull.”
Peer 2 – ” I love how you combined runny and clotted blood to create a realistic effect. The result is great.”
Peer 3 – ” This is a great design, and you should be so proud of how well your linework went.”
Formative assessment – Stone creature
Lecturer feedback -Natasha was really pleased with my overall outcome, stating how she could clearly see how organised I am when planning my work, and loves the close attention to detail. “This texture combination is excellent, and really helps bring the design to life”
Model feedback – ” I love how you used a combination of textures and techniques to make sure the look was as realistic as possible. I think it would be even better if you added on the prosthetics today, and am so exited to see what this looks like next week.”
Peer 1 – ” I know how worried you were at the start of this process, but all your hard work paid off in the end. This looks amazing and you should be so proud of yourself”
Peer 2 – ” I love how you made sure to combine many techniques, allowing you to show your work at the best of it’s ability. I love this look and think your ideas are very clearly represented. “